
Zirconia: In Whole Cloth Zirconia is far more than just a product! Just as with metal ceramics, all zirconia crowns are not created equal. The rush to digital laboratory services was led by the larger labs with the manpower and capital to make the transition. We owe them a debt of gratitude for those early efforts and the risks that they took have been paying off for all of us. Materials will change, but the bedrock principals of art and science remain fixed in education. Suddenly the industry is beginning to see the laboratory technicians that were influenced by the masters like Willy Geller and Yamamoto get involved in digital laboratory services. It appears that the small fraternity of highly skilled artists, armed with the knowledge of Grad Prosth 101 will likely continue on as functional esthetic leaders. Let’s walk through the fabrication of the following zirconia bridge and see how everything has changed while so much has stayed the same. 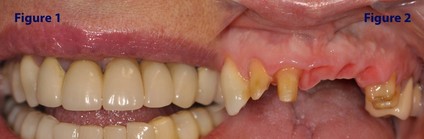 The patient presented to Dr. Kimberly Santiago with recurrent decay on distal abutments of #12 and 13. Previous bridge #7-#13 had been in place for 15-plus years after the patient had lost her teeth in an accident. She was generally happy with existing bridge and wanted the original esthetics to be duplicated with a brighter shade. Case was scanned into a 3-Shape scanner, digitally designed and cut back for layered ceramic on facial of #6 -11 and occlusal facial of #12-13. Note the mammelon formation and minimal cutback on facials of all restorations. Imitating natural dentin form on the zirconia core can prevent porcelain shear and compliment esthetic efforts by using a staining technique on areas to receive layered ceramic. Fig. #3. 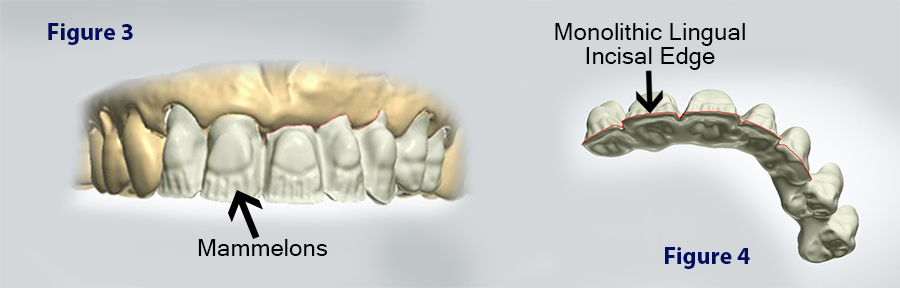 This case was designed for strength and esthetics by using a design technique we call monolithic layering. What the strategy really means is that we design monolithic to receive as much of the centric and functional load as possible with regards to safety and maximum esthetics. To serve this purpose, we elected to design monolithic on the entire lingual of all anteriors and extend the monolithic zirconia to the most lingual portion of the incisal edge as well. Fig. #4. Subsequent to this case, we started hand-shaping the mammelons during the green state (pre-sintered) to be more exact with our facial esthetics. Heavy reduction of zirconia frames after sintering can be very risky, so labs that have their own mill are at a great advantage for reshaping and coloring the frame for maximum esthetics. Milling experience teaches us that certain areas like sharp incisal edges, deep interproximals or mammelons may not come out of the mill just as designed, so those areas are left to green state hand-milling by the technician. I cannot overstate the importance of having the ability to adjust the zirconia in the green state, or how technically limited we were when we outsourced our milling needs! Green state adjustments: Interproximal depths were increased, incisal embrasures were opened, and the incisal edges were modified. Fig. #5. Please pay careful attention here, because we are going to talk about color, its four-part complexity, and how it all comes together for the desired color and value. Remember, this technique changes with the color demands and complexity of each given case, so art and experience will have a significant influence on the final outcome for every case and each ceramist. 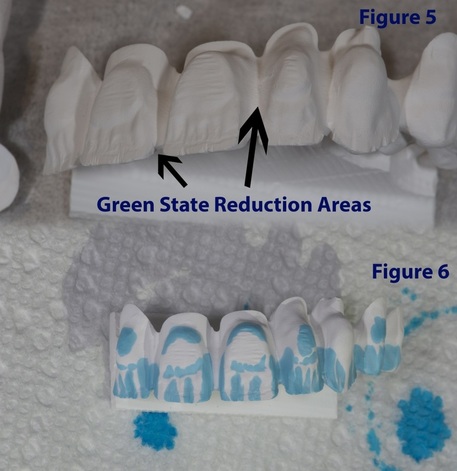 The following is the path that Gary chose to arrive at the esthetic goals for this patient. The facials of the restorations were painted with Zirkon Zahn incisal blue color liquid to achieve a desired color in the painted areas. This liquid also serves as a color inhibitor in those same areas when the prosthesis is finally immersed in the pre-chosen A-2 color liquid and sintered. Fig. #6. The first layer of the color canvas has now been set, and the restoration is placed in a high-heat sintering furnace. After sintering, the general bridge color of A-2 and the incisal blue-stained areas are discernible to the naked eye. Fig. #7. The sintered resoration canvas is now modified again by firing in Diazir ceramic stain for additional color effects for areas of pink ceramic, gingival margins, interproximals, etc. Fig. #8. 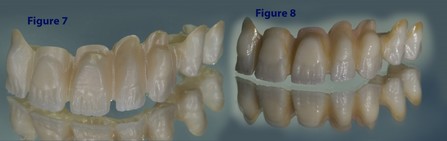 Fig. #9. The next step is the porcelain wash bake. The contour of the entire case was pre-determined in the CAD design phase, and the canvas is now ready for the layered ceramic. From the pink ceramic of the pontics to the incisal edges, Gary will begin placing the last part of his color ensemble to the case 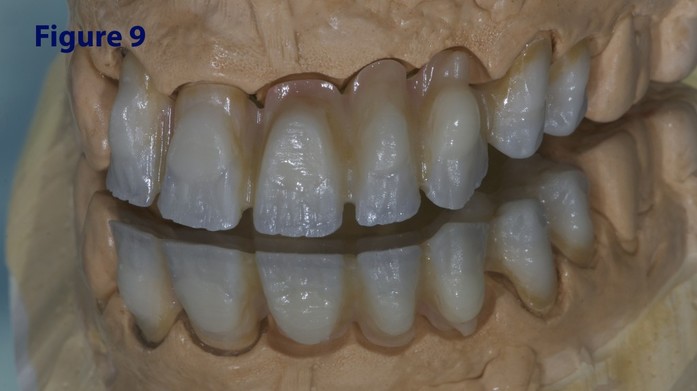 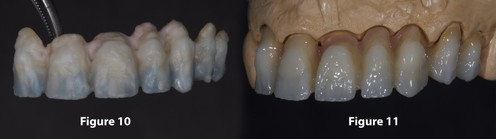 Layered ceramic build up. Fig. #10. First bake. Fig. #11. Final bake is completed (no photo) and case is then finished. 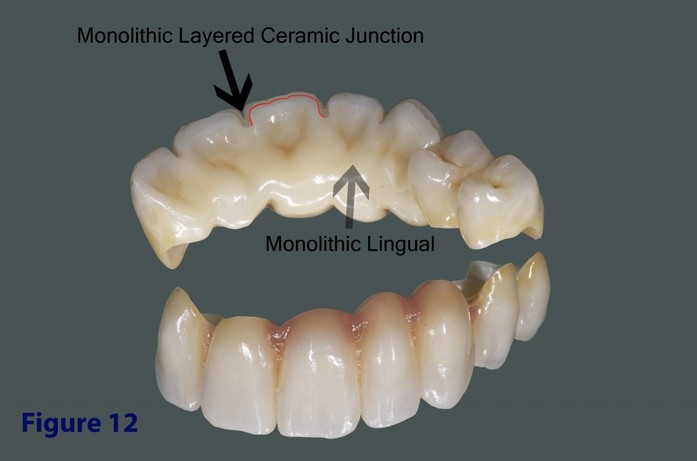 Fig. #12. Notice the beauty in the monolithic lingual and the natural look of the layered ceramic and monolithic zirconia sharing the incisal edge. Finished case. Fig. #13. 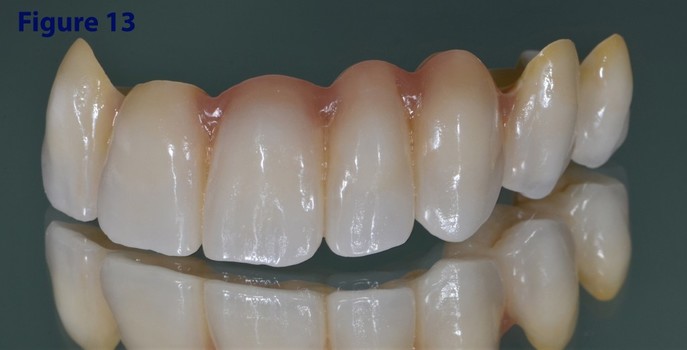 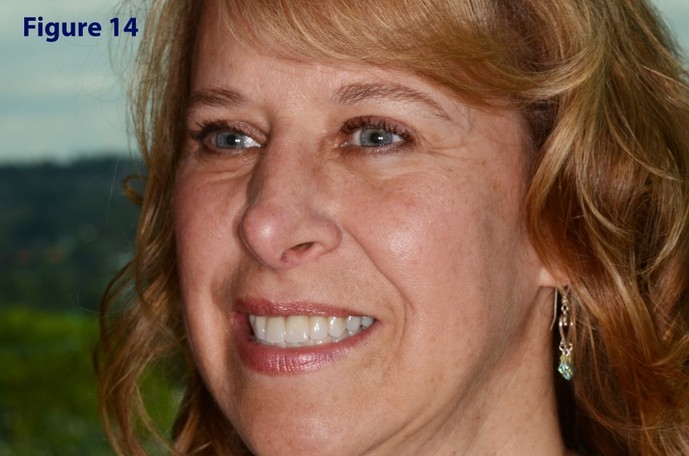  Fig. #14. The patient was gracious enough to come to our lab for post-op photographs and she brought with her the joy of how her new smile made her feel. It was a good day to be a dentist…and a lab tech. All dentists are not the same, all labs are not the same, and there will always be patients that expect the best – regardless of restrictive dental insurance plans. Whole Cloth Zirconia can do the heavy lifting!
- Dene LeBeau Special thanks on this blog to Dr. Kim Santiago and everyone at our lab! ALWAYS use recommended procedures when reducing or adjusting Zirconia. NEVER adjust the inside of a Zirconia crown. ALWAYS adjust the prep instead.
0 Comments
Your comment will be posted after it is approved.
Leave a Reply. |
Dental Street Blog
Categories
All
Archives
November 2022

|
 RSS Feed
|
|
HoursM-TH: 7am - 4pm
PST |
Telephone425-251-3535
|
|
Copyright © 2011 LeBeau all rights reserved Website created by: Cuddy Connections LLC.