
PHOTOGRAPHY TIPS
|
The Goal
Now generally understood to mean digital photography - in "shade-matching" is to provide the dental lab with additional visual information for them to use in the making of high-quality prosthetics. On the surface, this sounds simple enough, but in practice it is the source of some confusion and frustration. The Problem
|
The Solution
B. Achieves a much higher level of color quality due to the larger and more sophisticated sensors.
C. Allows for greater image sharpness and when used with a macro-lense, creates superb "depth of field".
2. Use a twin light (or "point source") flash - instead of a traditional "ring flash".
A. Ringflash - Is where the light source is directly on the lens axis, produces an obvious reflection on the central anteriors, which not only wipes out a lot of color information, but also minimizes the capture of surface texture and subtle opalescence.
B. Traditional Flash - When the light sources are removed off-axis a few inches, greatly reduce these problems and can still be used for the full course of intraoral photography. Good cameras to use:
- Canon MT24 Twilight
- Nikon R1 Speedlight
- Use a true macro lense - the higher the quality, the better.
- Stay away from using "close-focus" zoom lenses, and although there are some excellent after-market lenses, generally sticking to the Cannon or Nikon macro lenses (100MM & 105MM) is a safe bet and good investment.
- Use a digital SLR camera - The most common misperception is that an inexpensive"point-and-shoot" camera will be easier to use, and therefore less prone to error.
B. Achieves a much higher level of color quality due to the larger and more sophisticated sensors.
C. Allows for greater image sharpness and when used with a macro-lense, creates superb "depth of field".
2. Use a twin light (or "point source") flash - instead of a traditional "ring flash".
A. Ringflash - Is where the light source is directly on the lens axis, produces an obvious reflection on the central anteriors, which not only wipes out a lot of color information, but also minimizes the capture of surface texture and subtle opalescence.
B. Traditional Flash - When the light sources are removed off-axis a few inches, greatly reduce these problems and can still be used for the full course of intraoral photography. Good cameras to use:
- Canon MT24 Twilight
- Nikon R1 Speedlight
- Use a true macro lense - the higher the quality, the better.
- Stay away from using "close-focus" zoom lenses, and although there are some excellent after-market lenses, generally sticking to the Cannon or Nikon macro lenses (100MM & 105MM) is a safe bet and good investment.
|
Camera Settings
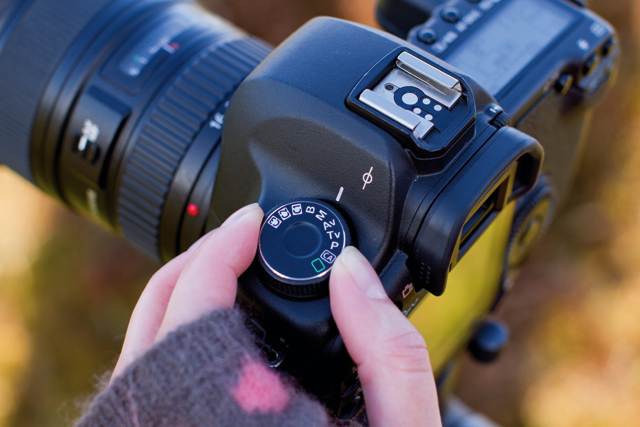
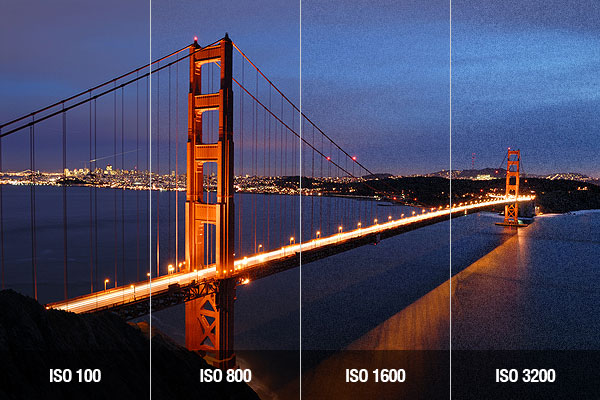
1. Set the camera on manual (which will allow you to) 2. Set the camera to a fast shutter speed (1/200th of a sec.) 3. Set the aperture to f/32 (some macro lenses may only go to f/22) - This is where you will obtain consistently maximum depth of field. 4. Set ISO to 100 A. The lowest ISO will give you the best color. B. Higher ISO will increase the exposure sensitivity, but do so at the expense of color quality and "noise". 5. Set the white balance to automatic (AWB on most cameras) A. Most other color pre-sets usually add color to compensate for the variations from "daylight balance in the shooting environment. B. Flashes vary, and cameras can vary, so you lab will generally have an easier time color-correcting from the more neutral value of the AWB setting. C. Trying to set a "custom-balance" can be tricky and create errors. Doing it incorrectly causes more problems than not doing it at all. |
|
6. Set the flash on it's TTL setting.
7. Make the flash do all the work. It will automatically and accurately adjust its output as you move closer or further away to frame your shot.
8. Making micro-adjustments in the flash's output is easily done on the flash control unit; slight exposure adjustments can just as easily be made on most cameras too, without changing the overall settings.
9. Auto-focus or manual-focus: it is up to you. I personally find it easier to set the lens to manually focus when I'm making intraoral photos, but others find it just as easy to use auto-focus
10. Communicate closely with your lab! They may want you to place a gray-black-white tab in the shot along with the dental shade tab. They may prefer working with raw files.
The Bottom Line
The best shade-matching technique is a close working relationship with your dental lab. These thumb-nail guidelines should get you started in the right direction. We provide digital photography training to dentists all across the country, and we get more requests for help with shade-matching than anything else. Our goal, and it should be yours too, is to make this process simple and repeatable. Your lab will thank you.
The best shade-matching technique is a close working relationship with your dental lab. These thumb-nail guidelines should get you started in the right direction. We provide digital photography training to dentists all across the country, and we get more requests for help with shade-matching than anything else. Our goal, and it should be yours too, is to make this process simple and repeatable. Your lab will thank you.
PHOTOGRAPHY TIPS UPDATE - 2023
Hi folks! I thought after all this time that it might be a good idea to add some thoughts to the “Photography Tips” page here. Though much has changed, much has also stayed very much the same. Right off the bat let’s be clear: the techniques I explained there remain your best practice for consistent, high-quality imaging. You’ve been getting great results from your digital camera and flash equipment, and they will continue serving you well for years to come. What I want to talk about right now are the mirrorless digital cameras and the newer generation of smartphones, and how this technology may or may not impact your intraoral and shade-matching photography.
Mirrorless cameras have come to dominate the market. Many manufacturers, such as Canon, have ceased development of new DSLR models (though they will continue selling their current ones), and other brands have stopped making them entirely. So just what exactly are they, and why have they been enthusiastically embraced by so many photographers?
The design of the SLR — Single Lens Reflex camera — goes back decades, long before the advent of the digital (that’s the D in DSLR) camera, in the 1950’s. In this tried-and-true design, the camera body houses a mirror behind the lens; the light traveling through the lens reflects off this mirror and is then bounced around a couple smaller mirrors in the top of the camera — the pentaprism — so that the image reaches your eye naturally oriented. This is an Optical Viewfinder (OVF). When you look through the OVF you are seeing the image in real time, a big advantage in speed and accuracy over the older rangefinders that pre-dated the SLR. When the shutter release button was hit, this mirror swings up and out of the way of the shutter curtain, which opens to expose the film or sensor and then returns to its sitting position. All this happens, of course, in a fraction of a second.
In a mirrorless camera, the mirror — as the name suggests — is removed, and the image is viewed through an electronic viewfinder (EVF) instead. For some it takes little getting used to, though in my experience it becomes very workable (I purchased a mirrorless Fuji a few years ago.) Minus the mirror and the housing for it, these cameras tend to be somewhat lighter than a comparable DSLR.
They generally produce better video in lower-priced models than their DSLR counterparts, and can take more images at faster shutter speeds, since it’s not mechanically raising and lowering a mirror at each exposure. There are many other electronic and technical features, such as focus peaking, that are beyond the scope of this article but may be of interest to the serious shooter outside the dental practice and worth investigating. They go through batteries pretty quickly though, since every operation is controlled electronically. Mirrorless cameras also use their own specially-designed lenses, although they can use most of your existing lenses with an adapter.
In your dental photography, these mirrorless features — the video quality, the fast shutter bursts, and so on — are probably not relevant to your needs. And there are many professional shooters who remain solidly committed to the DSLR for a number of reasons, things such as battery life, optical viewfinders, lens selection, and so on. They are still very much available. Bottom line? Keep on using that DSLR, macro lens, and ring flash system in the clinic. Switching to mirrorless for that use will entail an investment and learning curve that may impact your work.
So what about the Smartphone? Clearly, the latest generations of Samsung, Google, and Apple iPhone come with impressive cameras. I own an iPhone 13 Pro Max. It’s pretty amazing how far that technology has come, but its practicality in the clinic is worth some scrutiny.
Bear in mind that a high-quality DSLR or mirrorless camera is a professional device for which an assortment of lenses and flash accessories make it appropriate for clinical imaging, none of which exists for the smartphone. Intraoral photography using a smartphone would be difficult and cumbersome at best. Even with some of the apps that are available to assist in this, the lack of a true macro lens and lighting make it virtually impossible, at least in my experience, to produce the kind of images that the camera, macro telephoto, and ring flash system does so easily.
I do know that there are a some dental professionals using them for facial and retracted smile images, but here too, color accuracy is hard to achieve. Color-neutral light sources, such as Solex, would help in that regard, but smartphones all tend to over-saturate color to a certain degree. This, of course, is desirable by most users for the way they typically use a smartphone camera for beautiful landscapes and people photography, but producing a neutral, color-accurate clinical image is difficult. The images may be perfectly appropriate to use for patient education and record keeping, but not something the dental lab can reliably use as an objective color standard. It’s also important to consider the security of a patient’s images and information being recorded on a device potentially connected to various cloud and internet services.
Bottom line? With all the advances being made in smartphone technology, some of these issues may well be resolved in coming years, but for now I’d be reluctant to recommend their use in dental photography, especially for shade-matching. As always, work with your lab to hear what they recommend. That’s always the best way forward.
|
BIO -
As for me, I should let you know that I have retired from my photography practice, including DMD Digital Photography. I’m always available to answer questions and enjoy interesting conversations about photography. Dave Hutt Founding partner, DMD, Digital Dental Photography Training / Workshops Coordinator [email protected] 503-449-0662 www.davehuttphotography.com |

|